


How to Restore Headlights? Clean & Clear
Kept revolving around queries like…
- How to clean headlights?
- How to clean foggy headlights?
- How to clean car headlights when they become blur or cloudy?
- What is headlight restoration?
- What is the cause of foggy headlights?
- Does headlight polish work?
- Should I get car headlight cleaner or headlight restore wipes?
- What is the DIY process of headlight restoration?
How difficult is that to drive with foggy or cloudy headlights, we at Swan Smash Repairs definitely know the cons of it especially in winters. Let us help you jumping in the realm of headlight restoration permanently. Stick to the article for a comprehensive guide on headlight restoration. Yellow and fad headlights can raise serious question while driving at night. Blur vision can be the reason of accident.
But, don’t worry… foggy headlights are very easy to restore. You don’t need to invest big amount on such processes. Either bring it to us or else follow the instructions. Still we promote services by experts and technicians.
How to Restore Headlights Permanently
What Causes Foggy Headlights?
Foggy headlights can result from a combination of factors, as you’ve mentioned. The key causes of foggy or cloudy headlights are:
Oxidation:
Most modern cars have headlights made of polycarbonate plastic. Over time, this plastic can develop microscopic cracks and yellowing when exposed to UV radiation from sunlight. This leads to a cloudy or foggy appearance.
Time and Weather Conditions:
While polycarbonate headlights are typically coated with a protective film, prolonged exposure to harsh weather conditions can cause this coating to degrade or peel off. This leaves the headlights vulnerable to oxidation and UV damage, making them appear foggy.
Water Vapor:
Moisture or condensation can accumulate inside the headlight housing due to temperature changes and weather conditions. This trapped water vapor can cause clouding or fogging of the headlight lenses.
Dirt and Chemicals:
Dust, dirt, and various chemicals from the road can accumulate on the surface of the headlights. This layer can contribute to a yellow or cloudy appearance over time. The combination of dirt and UV exposure can lead to a hazy or foggy look.
To prevent and address foggy headlights, you can consider the following measures:
- Clean your headlights regularly to remove dirt, grime, and chemicals. Use a mild soap and water or specialized headlight cleaning products.
- Apply a protective coating or sealant to your headlights to shield them from UV damage and oxidation. This can help maintain their clarity and prevent fogging.
- If your headlights are already foggy, you can use headlight restoration kits, which often include sandpaper, polishing compounds, and UV-resistant coatings to restore their clarity.
- If the fogging is severe, consider professional headlight restoration services like Swan Smash Repairs, where experts can sand, polish, and reseal your headlights.
- Whenever possible, park your car in a garage or under a car cover to protect the headlights from UV exposure and harsh weather conditions.
By taking preventive measures and addressing foggy headlights promptly, you can ensure your headlights remain clear and functional, which is essential for safe driving at night or in low-visibility conditions.
How to Restore Auto Headlights?
Sanding is one of the most effective way to restore headlights. Sanding headlight strips help in removing the faded and foggy/cloudy layers from the lenses and make it shiny again.
Below mentioned is the list of your accessories required for DIY headlight restoration:
- Soap Water-Warm
- Plain Water
- Dry Cloth-Soft
- Painter/Masking Tape
- Sanding Sheets- 2000/1000/600 grit
- Plastic Polisher
- UV Resistant Sealant
Clean Headlights:
Before sanding your headlights, it’s important to clean them properly. Sanding without adequate cleaning will push contaminants deep into the surface, resulting in a rough, uneven texture with poor adhesion. To clean the headlight lenses, use warm, soapy water, rinse, and then dry them with a soft cloth. It’s a good idea to also clean the surrounding areas for the next step.
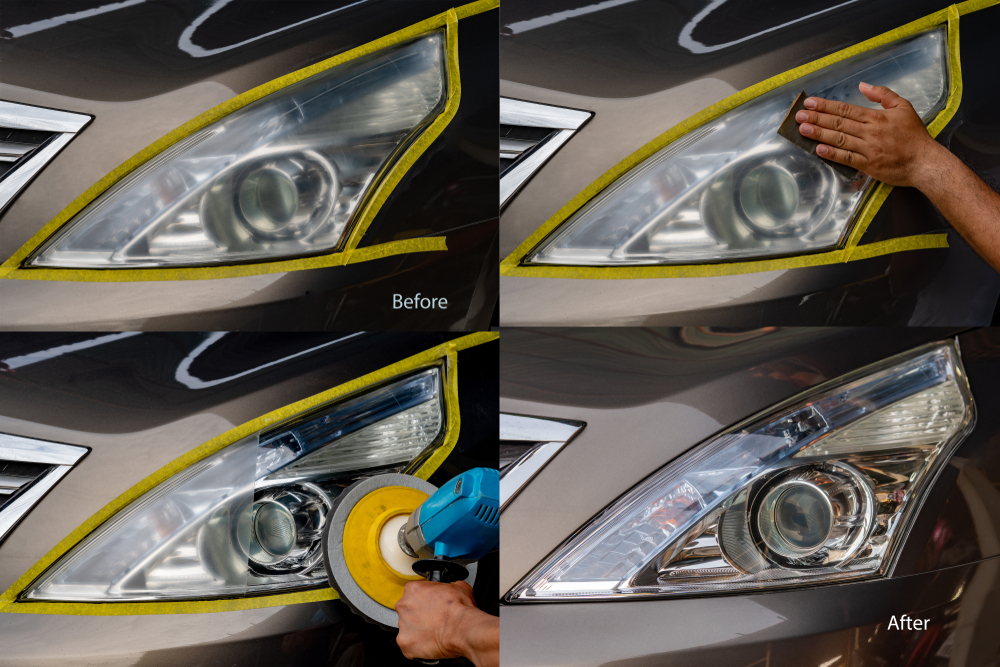
Tape-Off the Area:
To prevent accidentally damaging your car’s paint during the sanding process, which could lead to additional costly repairs, apply masking or painter’s tape around the headlight area. Usually, two strips of tape are sufficient. If you still feel uncertain, you have the option to remove the headlights, although this is a more labor-intensive task.
Sanding Headlights:
Once your headlights are clean and the area is taped off, it’s time to start the sanding process. This requires some elbow grease and various grits of sandpaper, with finer grits producing smoother results. Begin with the rough option and gradually work your way to the finest.
Here are the steps for sanding headlights in this DIY restoration project:
- Dry sand with 600 grit sandpaper:
Start with the coarsest 600 grit sandpaper and sand the headlights in straight, horizontal lines until the entire surface is covered. Maintain a consistent pattern until you’re satisfied the foggy layer is removed. For heavily oxidized and cloudy headlights, you may use 400-grit sandpaper.
- Wet sand with 1,000 grit sandpaper:
Use a water spray bottle to apply water as a lubricant on the headlight’s surface, then lightly wet sand using 1,000 grit wet or wet-dry sandpaper. Maintain consistent sanding motions for an easier headlight restoration process and keep the surface lubricated with water.
- Wet sand with 2,000 grit sandpaper:
By this stage, your headlights should be clearer. Use a 2,000 grit wet-dry sandpaper to smooth out the headlight lens surface. As in the previous step, keep the surface lubricated with water and use consistent motions.
Clean and Polish:
Your headlights will seem cleaner when the hazy coating is removed. To get a showroom-quality gloss, remove sanding residue from the surface using alcohol and paper towels. Then, for an additional shine, use a polishing chemical and a flannel polishing cloth in continuous motions. If you prefer power equipment, a cotton buffing wheel on an angle grinder or a felt polishing wheel on an angle grinder or die grinder may be used to buff and polish your headlights. With these buffing wheels, use a blue rouge buffing compound bar on a low level to avoid scorching the plastic surface, which might cause damage.
Apply UV Sealant:
While sanding is an effective way to restore headlights, it’s not something you want to do frequently. To maintain the clarity of your headlights for an extended period, finish the project by applying a UV sealant. Applying at least three coats of UV sealant will prevent your headlights from oxidizing again and help preserve the shine achieved through sanding.
Quick (Temporary) Fixes to Restore Headlights:
If you need a quick, temporary solution to clean foggy headlights, here are some easy options:
Toothpaste:
Mix toothpaste with baking soda, rub it onto the headlight’s surface, let it dry, and then wipe it off with a soft, wet cloth for improved clarity.
Baking Soda and Distilled Vinegar:
Mix equal parts baking soda and vinegar to create a paste, rub it on the headlights, let it sit, and then wipe it away with a soft cloth for shinier headlights.
Coca Cola:
Transfer diet coke into a spray bottle, spray it on your headlights, let it sit, and then dry it using a microfiber cloth. Repeat if necessary for heavily oxidized headlights.
Dish Soap:
Wipe off your headlights to remove debris, apply hot water and dish soap, let it sit, then wipe in circular motions, and rinse. Repeat as needed.
Preventing Headlights from Oxidizing:
- To minimize headlight oxidation, consider the following steps:
- Park in the shade to reduce exposure to UV radiation, a leading cause of yellowing headlights.
- Regularly wash your car using appropriate cleaners to prevent dirt and chemical buildup on the headlights.
- Periodically sand your car headlights, even before they become severely yellowed, to keep them looking shiny and clear.
Conclusion:
Headlight restoration can be an easy DIY, if you follow all of the above mentioned instructions. Not always wondering for headlight restorer or best headlight restoration kit when you can make your own. At Swan Smash repair, we offer comprehensive headlight restoration services for better and long lasting results. Rather practicing on your car why not bring it to the expert.
Get free consultation and guidance from our technical team. Follow the safety measures and drive safe. Above mentioned DIY headlight restoration techniques are temporary while sanding is a permanent option to restoring your headlights.
We hope no more queries regarding restoring headlights. Still have, contact us today.